
OMRON ZG2Sensors/ Displacement Sensors / Measurement Sensors/Profile Measuring Sensors
OMRON ZG2 Sensors
OMRON ZG2 Dimensions
/Images/l_2041-25-119087-198x198.jpglast update: April 20, 2016
Easier and much more accurate for profile measurement
Stable measurement regardless of color, material, and shape complexity
Simple configuration
Plug & play! Just connecting Sensor head and Controller.

* Equipped with sensor controller ZG2-WDC_1A as standard.
A wide variety of measurement items

Painted object and black rubber
12x the conventional sensitivity (Industry's best)
7x the conventional ambient illumination
Dark colored materials or materials with a matt finish, like black rubber often do not reflect sufficient light to maintain a stable measurement. They are also susceptible to the influences of ambient light so are difficult to measure using conventional laser measurement sensors. The ZG2 solves these problems because it is supersensitive and significantly reduces ambient noise. It also has an APS function to automatically tune parameters such as a receiver’s sensitivity and background suppression level at optimal levels according to the ambient light conditions. Shape profiles can also be easily reproduced at optimal conditions to achieve high precision measurement.
Measurement of moving objects is possible because measurement can be performed within a short exposure time.
* For details, see descriptions of the APS function (Catalog) and new optical system ONPS (Catalog).

Inclined transparent object or glossy object
2.5x the conventional inclination tolerance (Industry’s best)
On an object with strong regular reflection components such as luster sides and transparent objects, the amount of light reflection significantly reduces when the object is slightly inclined, lowering measurement stability. The sensor head ZG2-WDS3VT with a high-performance gauss lens is the solution for the problem. Its inclination acceptance range has been increased to 2.5 times as compared to conventional models so transparent objects can be measured up to a ±5° inclination at a stable level. Because the ZG2 has this function, it is useful for assembly inspections for lenses and glass plates.
* For details, see descriptions of the high-performance gauss lens (Catalog).
Assembly inspection of electronic parts
The ZG2 can measure parts with glass or a glossy object such as CCDs, CMOSs, and crystal splinters of quartz resonators at a stable level. It can be used for assembly inspections of parts because it can measure steps on a substrate or package side.

Assembly inspection of lenses
The ZG2 can measure the step between the peak of a lens and lens holder to check if they are assembled properly.

High-speed takt-time line
10x the conventional speed
Reproducing a clear, stable profile is difficult for objects with both black and metal sides, cylindrical objects, and complex-shaped objects because the amount of laser reflection and reflection angle differ according to the positions of different materials on such objects. To solve the problem, Omron's unique "multi-sensitivity function" has been improved. The measurement speed for the function has been increased so that the function can be used in high-speed takt-time lines.
* For details, see descriptions of high-speed multi sensitivity (Catalog).

Measurement of wide target

Two sensor controllers are linked and two sensor heads perform synchronous measurement to increase the measurement range to 140 mm. With the link method, the ZG2 Series provides the optimum solution for any intended purpose.
Measurement by finding the inflection point of the object

The sensor has a measurement function to capture points where an angle varies on a target as an “inflection point.” This function enables the measurement of a step or edge width of a feature point of a target.
Measurement of position and angle of intersection

The sensor has a function to measure the “intersection coordinates” and “intersection angle” on two linear lines on a target. An example of a useful application of this function is tracer control for a welding torch for targets to be welded.
Simplified Sensor Head Adjustment
The “installation correction function” automatically makes adjustments to parallelly align the sensor head with the target. The function eliminates the gap between the reference plane and sensor head inclination caused during setup and in turn significantly reduces the time spent for adjustment during the setup of the sensor head.

* When inclination is great, a measurement error may occur. Check the measurement accuracy in actual measurement conditions prior to use.
Intuitive setting
Basic setting requires only three steps. Omron's unique interface maximizes the sensing performance with extremely simple operation.

* Screen images are simulated.
Simultaneous measurement of two or more points
Measurements can be performed for up to eight measurement points selected from a profile simultaneously so different types of inspections can be carried out at the same time when necessary. Measurement items can be selected from among 20 items including edge width, height, inclination, step, and sectional area according to the intended purpose.

Active Position Compensation Control
The position and inclination are automatically corrected even for targets for which positioning is difficult. This helps to perform stable in-line measurement.

Data Storage and Trend Analysis
A data storage unit is now available for storing measurement values and profile data.
Data can be loaded on a PC from a memory card or via serial communication and can be used to manage manufacturing history, monitor tendency, or analyze defects.

* For logging capacity, see System Configuration (Catalog).
Large Programme Capacity
Measurement conditions for up to 16 items (16 banks) can be registered in the sensor controller unit. Banks can be easily switched by inputting a signal, inputting a command, or operating a key. When the data storage unit is used, up to 4,096 banks can be registered for quick response to flexible production lines.

last update: April 20, 2016
Purchase the OMRON Profile Measuring Sensors Please fill in the following
If you have just landed here, this product OMRON ZG2 Sensors,Sensors is offered online by Tianin FLD Technical Co.,Ltd. This is an online store providing Sensors at wholesale prices for consumers. You can call us or send enquiry, we would give you the prices, packing,deliverty and more detailed information on the ZG2 We cooperate with DHL,TNT,FEDEX,UPS,EMS,etc.They guarantee to meet your needs in terms of time and money,even if you need your OMRON ZG2Sensors tomorrow morning (aka overnight or next day air) on your desk, 2, 3 days or more.Note to international customers, YES, we ship worldwide.
NY51[]-A Industrial PC Platform NY-series IPC Programmable Multi-Axis Controller/Features
E3Z-LS Distance-settable Photoelectric Sensor/Features
E2A3 Cylindrical Proximity Sensor/Features
VAQ Pushbutton Switch (Cylindrical 10.5-dia.)/Features
E5C2 Temperature Controller/Features
OMRON ZG2 specification
ZG2 Smart Sensor (2D Measurement Sensor)/Specificationslast update: May 15, 2018
Sensor Heads
| Item | ZG2-WDS8T | ZG2-WDS22 | ZG2-WDS70 | ZG2-WDS3VT | ||||
|---|---|---|---|---|---|---|---|---|
| Optical system | Diffuse reflective | Regular reflective | Diffuse reflective | Regular reflective | Diffuse reflective | Regular reflective | Diffuse reflective | |
| Meas- urement range | Height direction | 50 ± 3 mm | 44 ± 2 mm | 100 ± 12 mm | 94 ± 10 mm | 210 ± 48 mm (In the high- precision mode) | 22.3 ± 0.5 mm | 10.6 ± 0.4 mm |
| Width direction *5 | 8 mm (typical) | 22 mm (typical) | 70 mm (typical) | 3 mm (typical) | ||||
| Resolution | Height direction *1 | 1 μm | 2.5 μm | 6 μm | 0.25 μm | |||
| Width direction | 13 μm (8 mm/631 pixels) | 35 μm (22 mm/631 pixels) | 111 μm (70 mm/ 631 pixels) | 5 μm (3 mm/631 pixels) | ||||
| Linearity (in the height direction) *2 | ± 0.1 %F.S. | |||||||
| Temperature characteristic *3 | 0.03 %F.S./℃ | 0.02 %F.S./℃ | 0.08 %F.S./℃ | |||||
| Light source | Type | Visible semiconductor laser | ||||||
| Wavelength | 658 nm | 650 nm | ||||||
| Output | 5 mW max. output, 1 mW max. exposure (without using optical instruments) | 1 mW max | ||||||
| Laser class | Class 2M of EN60825-1/IEC60825-1 Class IIIB of FDA (21CFR 1040.10 and 1040.11) | Class 2 of EN60825-1/ IEC60825-1 Class II of FDA (21CFR 1040.10 and 1040.11) | ||||||
| Beam shape (at measurement center distance) *4 | 30 μm × 24 mm (typical) | 60 μm × 45 mm (typical) | 120 μm × 75 mm (typical) | 25 μm × 4 mm (typical) | ||||
| LED | STANDBY: Lights when laser irradiation preparation is complete (indication color: green) | |||||||
| LD_ON: Lights when the laser is irradiating (indication color: green) | ||||||||
| Measurement object | Surface of non-transparent/transparent objects | Surface of non- transparent objects | Surface of non- transparent/ transparent objects | |||||
| Environ- mental resistance | Ambient light intensity | Illumination on the photo-receiving face 7,000 lx max.: Incandescent lamp | ||||||
| Ambient temperature | Operating: 0 to 50℃, Storage: -15 to 60℃ (with no icing or condensation) | |||||||
| Ambient humidity | Operating and storage: 35 to 85 % (with no condensation) | |||||||
| Degree of protection *6 | IP66(IEC60529) | IP67(IEC60529) | ||||||
| Vibration resistance (destruction) | 10 to 150 Hz with 0.35 mm single amplitude for 80 min each in X, Y, and Z directions | |||||||
| Shock resistance (destruction) | 150 m/s2, 3 times each in 6 directions (up/down, right/left, forward/backward) | |||||||
| Materials | Case: Aluminum diecast, Front cover: Glass, Cable insulation: Heat-resistive polyvinyl chloride (PVC), Connector: Zinc alloy or brass | |||||||
| Cable length | 0.5 m, 2 m (flexible cable) | |||||||
| Minimum bending radius | 68 mm | |||||||
| Weight | Approx. 500 g | Approx. 500 g | Approx. 650 g | Approx. 300 g | ||||
| Accessories | Laser labels (English labels), Ferrite core (2), Instruction manual | |||||||
*1. Obtained by setting an OMRON standard measurement object at the measurement center distance and determining
the average height of the beam line.
The conditions are given in the table below. However, satisfactory resolution cannot e attained in strong
electromagnetic fields.
The minimum resolution of the ZG2-WDS8T/WDS3VT is 0.25 μm, even when the average number of operations is
increased. Resolution does not go any lower.
| Model | CCD mode | Average No. of operations | Measurement object | |
|---|---|---|---|---|
| Regular reflective | Diffuse reflective | |||
| ZG2-WDS8T/ ZG2-WDS22/ ZG2-WDS70 | High- precision mode | 64 | OMRON standard white alumina ceramic obje | |
| ZG2-WDS3VT | OMRON standard mirrored object | OMRON standard diffuse reflective object | ||
*2. The tolerance for and ideal straight line obtained by determining the average height of and OMRON standard
measurement object for the beam line.
The CCD high-resolution mode is used. Linearity varies depending on the measurement object.
| Model | CCD mode | Average No. of operations | Measurement object | |
|---|---|---|---|---|
| Regular reflective | Diffuse reflective | |||
| ZG2-WDS8T/ ZG2-WDS22/ ZG2-WDS70 | High- resolution mode | 1 | OMRON standard white alumina ceramic object | |
| ZG2-WDS3VT | OMRON standard mirrored object | OMRON standard diffuse reflective object | ||
*3. A value attained by using an aluminum jig to secure the distance between the Sensor Head and the measurement
object. The CCD standard mode is used.
*4. Defined as 1/e2 (13.5%) of the center light intensity.
This may be influenced when light leakage also exists outside the defined area and the reflectivity of the light around
the measurement object is higher than that of the measurement object.
*5. A typical value of the measurement range (width direction) near the measurement center distance.
This is not a guaranteed value.
*6. Protection structure of connector area is IP40.
Sensor Controllers
| Item | ZG2-WDC11/WDC11A | ZG2-WDC41/WDC41A | ||
|---|---|---|---|---|
| Input/output type | NPN | PNP | ||
| No. of connectable Sensor Heads | 1 per Controller | |||
| No. of connectable Controllers | 2 | |||
| Measurement cycle * | 16 ms (high-precision mode), 8 ms (standard mode), 5 ms (high- speed mode) | |||
| Min. display unit | 10 nm | |||
| Display range | -999.99999 to 999.99999 | |||
| Display | LCD monitor | 2.2-inch TFT color LCD (557 x 234 pixels) | ||
| LEDs | Judgment indicators for each task (indication color: orange): T1, T2, T3, T4 Laser indicator (indication color: green): LD_ON Zero reset indicator (indication color: green): ZERO Trigger indicators (indication color: green): TRIG | |||
| External interface | Input/ output signal lines | Analog outputs | Select voltage or current (using the sliding switch on the bottom surface) Voltage output: -10 to 10 V, output impedance: 40 Ω Current output: 4 to 20 mA, maximum load resistance: 300 Ω | |
| Judgment output (ALL-PASS/NG/ERROR) | NPN open collector 30 VDC, 50 mA max. Residual voltage: 1.2 V max. | PNP open collector 50 mA max. Residual voltage: 1.2 V max. | ||
| Trigger auxiliary output (ENABLE/GATE) | ||||
| Laser stop input (LD-OFF) | ON: O V short or 1.5 V max. OFF: Open (leakage current: 0.1 mA max.) | ON: Power supply voltage short or power supply voltage -1.5 V max. OFF: Open (leakage current: 0.1 mA max.) | ||
| Zero reset input (ZERO) | ||||
| Measurement trigger input (TRIG) | ||||
| Bank switching input (BANK A to D) | ||||
| Serial I/O | USB2.0 | 1 port, full speed (12 Mbps), MINI-B | ||
| RS-232C | 1 port, 115,200 bps max. | |||
| Parallel output (when ZG-RPD is mounted) | Output | 18 - terminal | ||
| Main functions | No. of setting banks | 16 | ||
| Sensitivity adjustment | Multi, High-speed multi, Auto, Fixed | |||
| Measurement items | Height, 2-point Step, 3-point Step, Edge position, Edge width, Angle, Intersection coordinates, Intersection angle, Sectional area, Calculations between tasks (up to eight items can be measured simultaneously) | |||
| Auxiliary functions | Filter, Laser power adjustment, Position correction (height, position, lope), Linked operation, Point of inflection measurement | |||
| Profiles saved | 16 profiles (1 profile per bank) | |||
| Trigger modes | External trigger/continuous | |||
| Ratings | Power supply voltage | 21.6 to 26.4 VDC (including ripple current) | ||
| Current consumption | 0.8 A max. (per sensor head) | |||
| Insulation resistance | 20 MΩ at 250 V between lead wires and Controller case | |||
| Dielectric strength | 1,000 VAC, 50/60 Hz for 1 min between lead wires and Controller case | |||
| Environmental resistance | Ambient temperature | Operating: 0 to 50℃, Storage: -15 to 60℃ (with no icing or condensation) | ||
| Ambient humidity | Operating and storage: 35 to 85 % (with no condensation) | |||
| Degree of protection | IP20 (IEC60529) | |||
| Vibration resistance (destruction) | Vibration frequency: 10 to 150 Hz, single amplitude: 0.35 mm, acceleration: 50 m/s2 | |||
| Shock resistance (destruction) | 150 m/s2, 3 times each in 6 directions (up/down, right/left, forward/backward) | |||
| Material | Case: Polycarbonate (PC), Cable insulation: Heat-resistive polyvinyl chloride (PCV) | |||
| Cable length | 2 m | |||
| Minimum bending radius | 57 mm | |||
| Weight | Approx. 300 g (including cable)(Packed state: Approx. 450 g) | |||
| Accessories | ZG2-WDC_1: Large Ferrite Core (1 piece), Insure Lock (1 piece), Instruction Manual ZG2-WDC_1A: Large Ferrite Core (1 piece), Small Ferrite Core(2 pieces),Insure Lock (1 piece), Instruction Manual, Smart Monitor ZG2 (exclusive PC software, CD-ROM) (See note 2.), USB cable | |||
*1. The measurement cycles stated here are values for FIXED/AUTO sensitivity modes.
The measurement cycle increases when the MULTI sensitivity/high-speed MULTI sensitivity mode
is selected and according to other settings. When the high power mode is set to ON, the shortest
measurement cycle becomes 95 ms regardless of the CCD mode setting. Also, when gang-mounting
Controllers and Data Storage Units, the measurement cycle increases approximately 22 ms.
The actual measurement cycle can be checked by the ECO monitor in RUN mode.*2. SmartMonitor ZG2
System Requirements
OS: Windows 10 (32-bit/64-bit version)
Windows 7 (32-bit/64-bit version)
Windows XP (Service Pack3 or higher, 32-bit version)
CPU: Intel Pentium III 1 GHz or faster (2 GHz min. recommended.)
Memory: 1 GB min.
Display screen: 1,024 × 768 dots min., 16 million colors min.
- Window is registered trademarks of Microsoft Corporation in the USA and other countries.
- Other company names and product names in this document are the trademarks or registered
trademarks or their respective companies.
Data Storage Unit
| Item | ZG2-DSU11 | ZG2-DSU41 | ||
|---|---|---|---|---|
| Input/output type | NPN | PNP | ||
| No. of connectable Controllers | 2 *1 | |||
| Connectable Controllers | ZG2-WDC11/WDC41 | |||
| External interface | Input/ output signal lines | Inputting starting/ terminating logging | ON: O V short or 1.5 V max. OFF: Open (leakage current: 0.1 mA max.) | ON: Power supply voltage short or power supply voltage -1.5 V max. OFF: Open (leakage current: 0.1 mA max.) |
| Judgment output (HIGH/PASS/ LOW/ERROR) | NPN open collector 30 VDC, 50 mA max. Residual voltage: 1.2 V max. | PNP open collector 50 mA max. Residual voltage: 1.2 V max. | ||
| Serial I/O | USB2.0 | 1 port, full speed (12 Mbps), MINI-B | ||
| RS-232C | 1 port, 115,200 bps max. | |||
| Functions | No. of logged data *2 | Memory of the main unit | Profiles saved: 5,120 profiles Measurement values saved: 65,000 values max. *3 | |
| Memory card (256 MB) *4 | Profiles saved: 35,328 profiles max. (256 profiles x 138 files) Measurement values saved: 7,150,000 values max. (65,000 values x 110 files) | |||
| Logging trigger functions | External triggers, data triggers (self-triggers), and time triggers | |||
| External banks functions | 4096 | |||
| Other functions | Alarm output functions | |||
| Ratings | Power supply voltage | 21.6 to 26.4 VDC (including ripple current) | ||
| Current consumption | 0.5 A max. | |||
| Environ- mental resistance | Ambient temperature | Operating: 0 to 50℃, Storage: 0 to 60℃ (with no icing or condensation) | ||
| Ambient humidity | Operating and storage: 35 to 85% (with no condensation) | |||
| Degree of protection | IP20 (IEC60529) | |||
| Material | Case: Polycarbonate (PC) | |||
| Cable length | 2 m | |||
| Minimum bending radius | 52 mm | |||
| Weight | Approx. 280 g | |||
| Accessories | Ferrite Core (1 piece), Instruction Manual | |||
*1. The controller link unit is necessary for linking.
*2. Data is saved in the memory of the main unit during logging. The data is automatically saved in a memory card after
logging is completed.The maximum number of logging differs according to set conditions.
*3. Measurement values for 65,000 measurements can be saved even when two sensor controllers are connected and
each performs eight tasks.
*4. The value is the maximum number achieved in the following conditions.
One sensor controller performs one measurement task.
Either profiles or measurement values are logged.
last update: May 15, 2018
OMRON ZG2 catalog
ZG2 Smart Sensor (2D Measurement Sensor)/Catalog- Catalog
- Manual
- CAD
English
Global Edition
| Catalog Name | Catalog Number [size] | Last Update | |
|---|---|---|---|
| | Q167-E1-01A [5569KB] | May 15, 201820180515 | ZG2 Catalog |
OMRON ZG2 lineup
ZG2 Smart Sensor (2D Measurement Sensor)/Lineuplast update: January 22, 2018
Sensor Heads
| Optical system | Regular reflective | Diffuse reflective | Diffuse reflective | Regular reflective | Diffuse reflective | Regular reflective | Diffuse reflective | |
|---|---|---|---|---|---|---|---|---|
| Meas- urement range | Width direction | 22.3 ± 0.5 mm | 10.6 ± 0.4 mm | 50 ± 3 mm | 44 ± 2 mm | 100 ± 12 mm | 94 ± 10 mm | 210 ± 48 mm |
| Height direction | 3 mm (typical) | 8 mm (typical) | 22 mm (typical) | 70 mm (typical) | ||||
| Resolution | Width direction | 0.25 μm | 1 μm | 2.5 μm | 6 μm | |||
| Height direction | 5 μm (3mm/631pixels) | 13 μm (8 mm/631 pixels) | 35 μm (22 mm/631 pixels) | 111 μm (70 mm/ 631 pixels) | ||||
| Model | ZG2-WDS3VT 2M | ZG2-WDS8T 2M | ZG2-WDS22 2M | ZG2-WDS70 2M | ||||
| ZG2-WDS3VT 0.5M | ZG2-WDS8T 0.5M | ZG2-WDS22 0.5M | ZG2-WDS70 0.5M | |||||
∗ For details, see the Ratings and Specifications Table.
Sensor Controllers
| Appearance | Power supply | Output type | Model |
|---|---|---|---|
 | 24 VDC | NPN | ZG2-WDC11A * |
| ZG2-WDC11 | |||
| PNP | ZG2-WDC41A * | ||
| ZG2-WDC41 |
* Setup support software for PC is attached.
Data Storage Unit
| Appearance | Power supply | Output type | Model |
|---|---|---|---|
 | 24 VDC | NPN | ZG2-DSU11 |
| PNP | ZG2-DSU41 |
Accessories (Order Separately)
Real-time Parallel Output Unit
| Appearance | Output type | Model |
|---|---|---|
 | NPN | ZG-RPD11-N |
| PNP | ZG-RPD41-N |
Sensor Head Extension Cable (Robot Cable)
| Appearance | Cable length | Model | Qty |
|---|---|---|---|
 | 25 m | ZG2-XC25CR | 1 |
| 15 m | ZG2-XC15CR | 1 | |
| 8 m | ZG2-XC8CR | 1 | |
| 3 m | ZG2-XC3CR | 1 |
RS-232C Cable
| Connecting device | Model | Qty |
|---|---|---|
| For PLC/PT connection (2 m) | ZS-XPT3 | 1 |
| For personal computer connection (2 m) | ZS-XRS3 | 1 |
Parallel Mounting Adaptor
| Appearance | Model |
|---|---|
 | ZS-XPM1 For 1 Unit |
 | ZS-XPM2 For 2 Units or more |
Controller Link Unit
| Appearance | Model |
|---|---|
 | ZS-XCN |
Memory Card
| Capacity | Model |
|---|---|
| 256 MB | HMC-EF283 |
| 512 MB | HMC-EF583 |
last update: January 22, 2018
OMRON ZG2 dimension
ZG2 Smart Sensor (2D Measurement Sensor)/Dimensionslast update: April 2, 2018
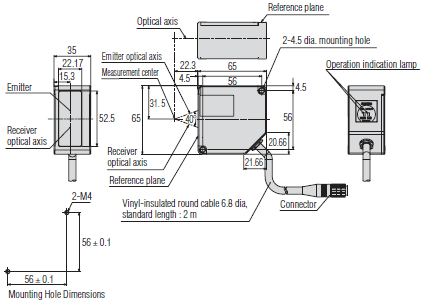
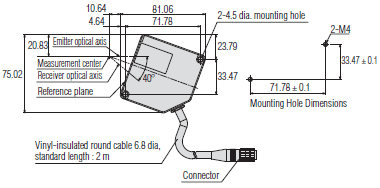
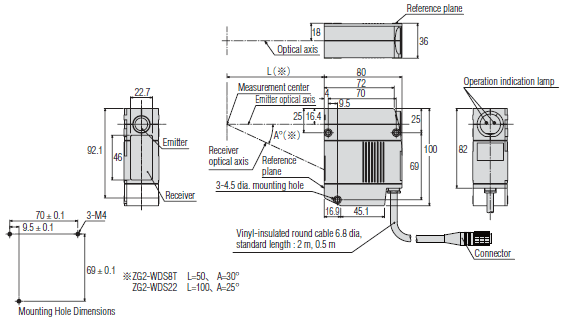
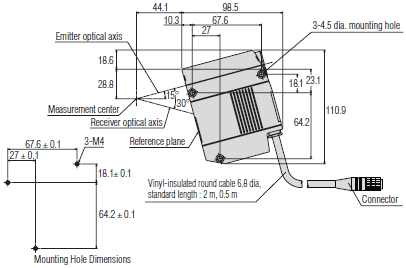
(Unit: mm)
Sensor Heads
ZG2-WDS3VT
〈Regular reflection〉
〈Diffuse reflective〉
ZG2-WDS8T/WDS22
〈Diffuse reflective〉
ZG2-WDS8T
〈Regular reflection〉
ZG2-WDS22
〈Regular reflection〉
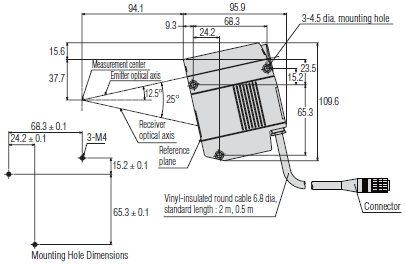
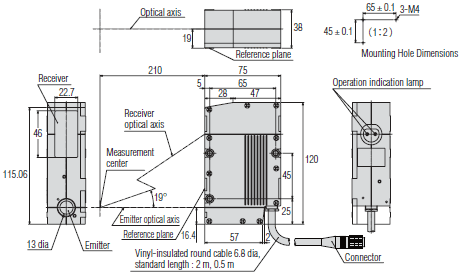
ZG2-WDS70
〈Diffuse reflective〉
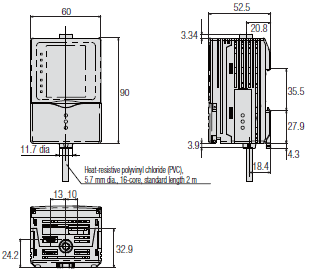
Sensor Controller
ZG2-WDC11/WDC41
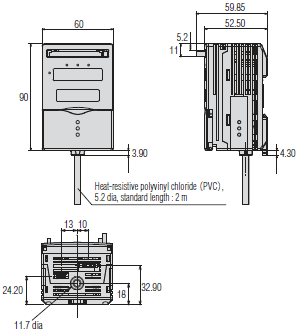
Data Storage Unit
ZG2-DSU11/DSU41
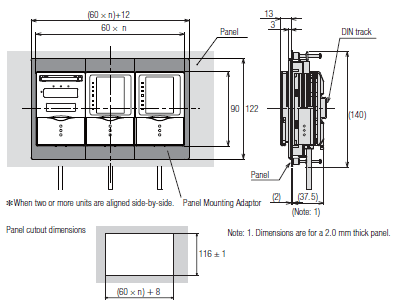
Panel Mounting Adaptor
ZS-XPM1/XPM2 (Dimensions for mounting on a control panel)
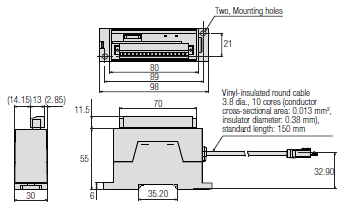
Real-time Parallel Output Unit
ZG-RPD11-N/RPD41-N
last update: April 2, 2018
- NO. ZG2
- TYPE:Displacement Sensors / Measurement Sensors Profile Measuring Sensors
 Copyright Statement
 - DATE:2021-06-08
- Associated products:
ZX-T Smart Sensors High-Precision Contact Type/Features ZX-GT Smart Sensor (Wide Laser Beam CCD Measurement Sensor)/Features