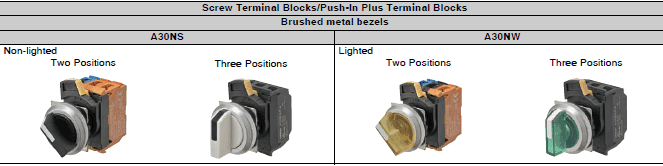
OMRON A30NS / A30NWSwitches/ Push Buttons / Indicator Lamps/φ30 Type
OMRON A30NS / A30NW Switches
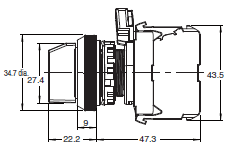
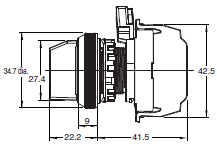
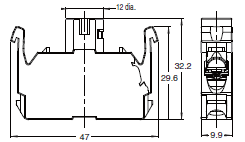
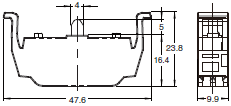
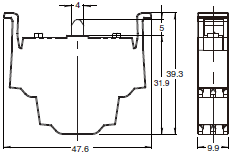
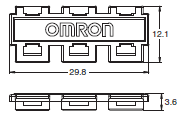
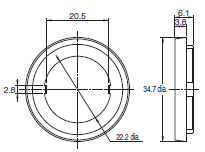
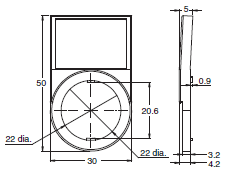
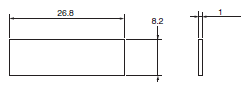
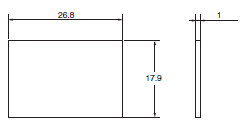
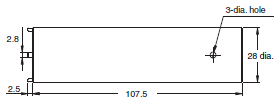
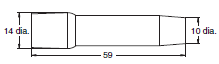
OMRON A30NS / A30NW Dimensions
/Images/l_3448-25-233637-198x198.jpglast update: October 03, 2016
Easy to Use
• You can connect up to three Contact Blocks in one stage for multistage expansion. (Screw terminal block type)
• Screw terminal structure is compatible with round crimp terminals. (Screw terminal block type)
Safety
• Easy-to-operate lock lever for secure locking.
• Easy-mounting Contact Blocks provide finger protection.
• No loose connections of wiring means maintenance-free use. (Push-In Plus terminal block type)
Product Lineup
• The buttons and bezels come in a wide variety of colors and shapes.
last update: October 03, 2016
Purchase the OMRON φ30 Type Please fill in the following
If you have just landed here, this product OMRON A30NS / A30NW Switches,Switches is offered online by Tianin FLD Technical Co.,Ltd. This is an online store providing Switches at wholesale prices for consumers. You can call us or send enquiry, we would give you the prices, packing,deliverty and more detailed information on the A30NS / A30NW We cooperate with DHL,TNT,FEDEX,UPS,EMS,etc.They guarantee to meet your needs in terms of time and money,even if you need your OMRON A30NS / A30NWSwitches tomorrow morning (aka overnight or next day air) on your desk, 2, 3 days or more.Note to international customers, YES, we ship worldwide.
MX-Z2000H Series Fiber Laser Marker/Features
F03-[] Electrodes and Accessories/Features
D40A / G9SX-NS Compact Non-Contact Door Switch/Non-Contact Door Switch Controller/Features
CRT1-TS04T / TS04P Temperature Input Units/Features
K8DT-VS Single-phase Voltage Relay/Features
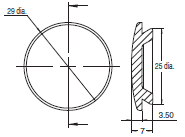
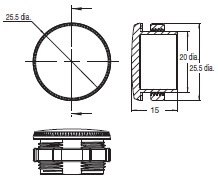
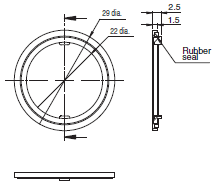
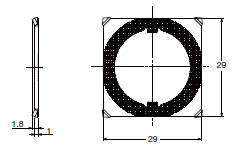
OMRON A30NS / A30NW dimension
A30NS / A30NW Selector Switches/Dimensionslast update: August 1, 2017
(Unit: mm)
Lighted and Non-lighted Selection Switches
Two-position Switches with Brushed Metal Bezels
A30N[]-2M[]-[][]A-G[]-[][]
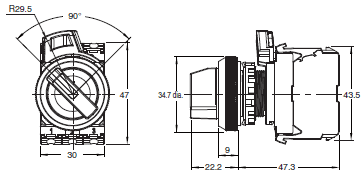
A30N[]-2M[]-[][]A-P[]-[][]
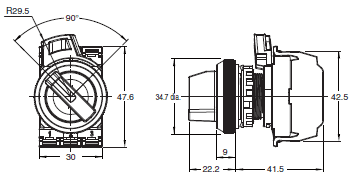
Three-position Switches with Brushed Metal Bezels
A30N[]-3M[]-[][]A-G[]-[][]
A30N[]-3M[]-[][]A-P[]-[][]
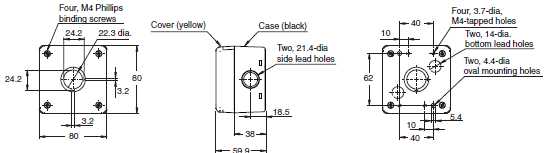
Depth with Linked Units
(Screw terminal block type)
Depth when a double-contact unit is mounted
(Push-In Plus terminal block type)
Subassemblies (Common)
LED Lamps
A22NZ-L-[][]
Mounting Collar
A22NZ-H-01
Screw terminal block
Contact Blocks
A22NZ-S-G1[]

Lighting Units
A22NZ-T-[]
Push-In Plus Terminal Blocks
Contact Blocks (Single Contact)
A22NZ-S-P1[]
Contact Blocks (Double Contact)
A22NZ-S-P2[]
Lighting Units
A22NZ-T-[]P

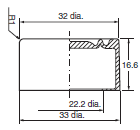
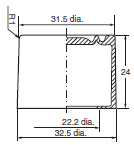
Accessories and Tools
Protective Cover
A22NZ-A303
Plastic Hole Plug
A22NZ-A-401
Metal Hole Plug
A22NZ-A-402
Lock Ring
A22NZ-A-403
Lock Ring
A22NZ-A-50501
Reinforcement Plate
A22NZ-A-C01
Control Box
A22NZ-A-B01Y
Sealing cap
For Flat Models A22Z-3600F
For projection models A22Z-3600T

For full-guard models A22Z-3600G
Resin Attachment for 30 dia.
A22Z-A30
Legend Plate Frames
General A22NZ-A-50103

Large A22NZ-A-51103
Legend Plates
General A22Z-3443[]-[]
Large A22Z-3453[]
Tightening Wrench
A22NZ-A-301
LED Lamp Extractor
A22NZ-A-302
Cap Tightening Wrench
A22Z-3908

last update: August 1, 2017
OMRON A30NS / A30NW accessory
A30NS / A30NW Selector Switches/Accessorylast update: April 2, 2018
Ordering Information
Accessories and Tools (Order Separately)
| Item | Appearance | Classification | Model | Remarks | |
|---|---|---|---|---|---|
| Protective Cover |  | --- | A22NZ-A-303 | A protector designed to prevent incorrect operation. Cannot be used together with other accessories. (Rubber seal included.) For 22.3 and 25.5-mm panel holes diameter. Key-type selector switches cannot be used. | |
| Plastic Hole Plug |  | Round | A22NZ-A-401 | Can be plugged into precut panel holes for future expansion. Applicable panel thickness: 0.8 to 3.0 mm For 22.3-mm panel hole diameter. | |
| Metal Hole Plug |  | Round | A22NZ-A-402 | Can be plugged into precut panel holes for future expansion. Applicable panel thickness: 0.8 to 6.0 mm (Rubber seal included.) For 22.3-mm panel hole diameter. | |
| Lock Ring |  | Round | A22NZ-A-403 | Used when a more secure lock is required to prevent rotation inside the Operation Unit. (Rubber seal included.) For 22.3-mm panel hole diameter. Can be used together with the A22NZ-A-50501 Lock Ring. | |
| Lock Ring |  | --- | A22NZ-A-50501 | Used when a more secure lock is required to prevent rotation of the Operation Unit. Can be used together with the A22NZ-A-403 Lock Ring. Can be used with the A22N Series and the A30N Series. | |
| Reinforcement Plate |  | --- | A22NZ-A-C01 | Used to reinforce Contact Blocks and Lighting Units, Refer to catalog for mounting instructions. | |
| Key |  | --- | A22NZ-K-01 | Used with a key-type selector switch. | |
| Control Box |  | 1 hole | A22NZ-A-B01Y | Applicable Range • Type with Screw Terminal Block One Switch can be linked. • Type with Push-in Plus Terminal Block Compatible only with Switches with a Single-contact Unit. For 22.3-mm panel hole diameter. | |
| Connector |  | Suitable Cable Diameter (mm) | 7 to 9 dia. | A22Z-3500-1 | Plastic connector used to extend a cable from the switch box. Refer to catalog for details. |
| 9 to 11 dia. | A22Z-3500-2 | ||||
| Sealing Caps |  | For flat models | A22Z-3600F | Used to prevent dust or water from entering the Operation Unit. Color: opaque Material: silicon For 22.3 and 25.5-mm panel holes diameter. Knob-type and key-type selector switches cannot be used. | |
| For projection models | A22Z-3600T | ||||
| For full-guard models | A22Z-3600G | ||||
| Resin Attachment for 30 dia. |  | Round | A22Z-A30 | Use when mounting to a panel with a 30-dia. hole. Refer to catalog for details. Purchase and mount a separate Lock Ring when using an indicator. | |
| Small Legend Plate Frame |  | Black | A22NZ-A-50103 | Legend Plate with no text on black background included. For 22.3-mm panel hole diameter. | |
| Small Legend Plates (Standard Size) |  | Without text | A22Z-3443B | Black | |
| A22Z-3443R | Red | ||||
| A22Z-3443W | White | ||||
| A22Z-3443C | Transparent | ||||
| ○ | A22Z-3443R-2 | White text on red background | |||
| STOP | A22Z-3443R-4 | ||||
| | | A22Z-3443B-1 | White text on black background | |||
| START | A22Z-3443B-3 | ||||
| ON | A22Z-3443B-5 | ||||
| OFF | A22Z-3443B-6 | ||||
| UP | A22Z-3443B-7 | ||||
| DOWN | A22Z-3443B-8 | ||||
| POWER ON | A22Z-3443B-9 | ||||
| OFF-ON | A22Z-3443B-10 | ||||
| Large Legend Plate Frame |  | Black | A22NZ-A-51103 | Legend Plate with no text on black background included. For 22.3-mm panel hole diameter. | |
| Large Legend Plates |  | Without text | A22Z-3453B | Black | |
| A22Z-3453R | Red | ||||
| A22Z-3453W | White | ||||
| A22Z-3453C | Transparent | ||||
| Tightening Wrench |  | --- | A22NZ-A-301 | Used to tighten Mounting Nuts from the back of the panel. | |
| LED Lamp Extractor |  | --- | A22NZ-A-302 | Made of rubber and used to easily remove and attach LED Lamps. | |
| Cap Tightening Wrench |  | --- | A22Z-3908 | Used to replace the Caps on Flat, Projected, and Fullguard Pushbutton Switches. | |
last update: April 2, 2018
OMRON A30NS / A30NW catalog
A30NS / A30NW Selector Switches/Catalog- Catalog
- CAD
English
Global Edition
| Catalog Name | Catalog Number [size] | Last Update | |
|---|---|---|---|
| | A254-E1-01 [55488KB] | Jan 15, 201920190115 | A22N/M22N/A30N Data Sheet |
| | A253-E1-04 [4664KB] | Dec 03, 201820181203 | A22N-P/A30N-P, M22N-P, A22NE-P Catalog |
| | Y218-E1-03 [13592KB] | Oct 02, 201720171002 | Innovation in Control Panel Building |
OMRON A30NS / A30NW specification
A30NS / A30NW Selector Switches/Specificationslast update: October 03, 2016
Specifications
Certified Safety Standard Ratings
UL 508 (File No. E76675), CSA C22.2 No.14
6 A 240 VAC, 10 A 120 VAC
TÜV (EN60947-5-1)
AC-15 3 A 240 VAC
DC-13 4 A 24 VDC
CCC (GB14048.5)
AC-15 3 A 240 VAC
DC-13 4 A 24 VDC
Application Standards
UL1059 and UL486E (Push-In Plus terminal block type)
Ratings
Contacts (Standard Load)
| Rated insulation voltage | 600 V | |||||
|---|---|---|---|---|---|---|
| Rated carry current | 10 A | |||||
| Rated voltage | 24 V | 120 V | 240 V | 380 V | 440 V | |
| AC at 50/60 Hz | Resistive load (AC-12) | 10 A | 10 A | 6 A | 2A | 2 A |
| Inductive load (AC-15) | 10 A | 6 A | 3 A | 1.9 A | 1.6 A | |
| DC | Resistive load (DC-12) | 8 A | 2.2 A | 1.1 A | --- | --- |
| Inductive load (DC-13) | 4 A | 1.1 A | 0.55 A | --- | --- | |
Note: 1. The above ratings were obtained by conducting tests under the following conditions.
(1) Ambient temperature: 20 ±2°C
(2) Ambient humidity: 65% ±5% RH
(3) Operating frequency: 30 operations/minute
2. Minimum applicable load: 10 mA at 5 VDC.
LED Lamps
| Rated voltage | Applied voltage | Rated current |
|---|---|---|
| 6 VAC/DC | 6 VAC/DC ±10% | Approx. 11 mA (red, orange, yellow, or blue) Approx. 5 mA (white or green) |
| 12 VAC/DC | 12 VAC/DC ±10% | Approx. 12 mA (red, orange, yellow, or blue) Approx. 5 mA (white or green) |
| 24 VAC/DC | 24 VAC/DC ±10% | Approx. 12 mA (red, orange, yellow, or blue) Approx. 5 mA (white or green) |
| 100 VAC | 100 VAC ±10% | Approx. 12 mA (red, orange, yellow, or blue) Approx. 5 mA (white or green) |
| 110 VAC | 110 VAC ±10% | |
| 120 VAC | 100 to 130 VAC | |
| 200 VAC | 200 VAC ±10% | Approx. 12 mA (red, orange, yellow, or blue) Approx. 5 mA (white or green) |
| 220 VAC | 220 VAC ±10% | |
| 230 VAC | 230 VAC ±10% | |
| 240 VAC | 220 to 250 VAC |
Specifications (When the Operation Unit, LED Lamp, Mounting Collar, Contact Blocks, and Lighting Unit Are Combined)
Characteristics
| Item | Selector Switches | ||
|---|---|---|---|
| Non-lighted models | Lighted models | ||
| Allowable operating frequency | Mechanical | 30 operations/minute max. | |
| Electrical | 30 operations/minute max. | ||
| Insulation resistance | 100 MΩ min. (at 500 VDC) | Not available for lighting units | |
| Contact resistance | 100 mΩ max. (initial value) | ||
| Dielectric strength | Between terminals of same polarity | 2,500 VAC at 50/60 Hz for 1 min. (initial value) | Not available for lighting units |
| Between each terminal and ground | 2,500 VAC at 50/60 Hz for 1 min. (initial value) | ||
| Vibration resistance | Malfunction | 10 to 55 Hz, 1.5-mm double amplitude (malfunction within 1 ms) | |
| Shock resistance | Malfunction | 1,000 m/s2 max. (malfunction within 1 ms) | |
| Durability | Mechanical | 500,000 operations min. (Switches with 3 positions: 300,000 operations min.) | |
| Electrical | 500,000 operations min. (Switches with 3 positions: 300,000 operations min.) (250 VAC, 3 A, with an inductive load having power factor cos θ = 0.4) | ||
| Ambient operating temperature*1 | -25 to 70°C | -25 to 55°C | |
| Ambient operating humidity | 35% to 85% RH | ||
| Ambient storage temperature*1 | -40 to 80°C | ||
| Degree of protection*2 | Conforming to IP66 | ||
| Electric shock protection class | Class II | ||
| PTI (tracking characteristic) | 175 | ||
| Degree of contamination (application environment) | 3 (EN 60947-5-1) | ||
| Weight | Approx. 60 g (for 1NC/1NO) | Approx. 75 g (for 1NC/1NO) | |
*1. With no icing or condensation.
*2. Degree of protection from the front of the panel.
Operating Characteristics (for SPST-NO/SPST-NC)
| Item | Selector Switches | |
|---|---|---|
| Manual reset | Automatic reset | |
| Total travel force (torque) (maximum TTF) | 0.6 N·m | 0.6 N·m |
| Total travel (TT) | 2 positions: Approx. 90°, 3 positions: Approx. 45° | |
| Resetting force (torque) (RF) | 0.5 N·m max. | --- |
Examples of Linked Contact Blocks (Screw terminal block type)

| Selector Switches | ||||
|---|---|---|---|---|
| 2 positions | 3 positions | |||
| Lighted | Non-lighted | Lighted | Non-lighted | |
| Linking example |  |  |  |  |
* If you use three Contact Blocks in stage 1, you can add one more Contact Block in the middle of stage 2.
Note: If you increase the number of Contact Blocks, evaluate the Switch under actual working conditions before permanent installation and use the Switch within a number of switching operations that will not adversely affect the Switch’s performance.
last update: October 03, 2016
OMRON A30NS / A30NW lineup
A30NS / A30NW Selector Switches/Lineuplast update: April 16, 2018
Operation Unit Colors

List of Models
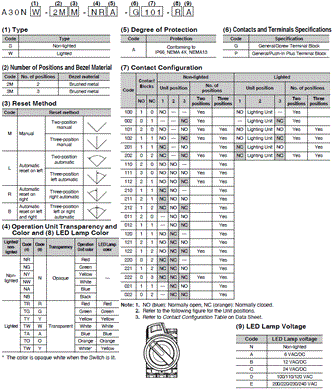
Model Number Structure
Model Number Legend
Please order Operation Units, LED lamps (lighted models only), Mounting Collars, Contact Blocks, and Lighting Units (lighted models only) separately. LED lamps, Mounting Collars, Contact Blocks, Lighting Units, and Lock Ring can also be used with the A22N series.
Model Numbers for Sets
Ordering Information
Model Numbers for Sets
Shipped as a set that includes the Operation Unit, Mounting Collar, and Contact Block.
Non-lighted, Two-position, Selector Switches
| Appearance | Bezel material | No. of outputs | Model | (3) Reset method | (4)(4) Operation Unit color | (7)(7)(7) Contact configuration |
|---|---|---|---|---|---|---|
| Brushed metal bezels  | 2M | 1 | A30NS-2M(3)- (4)(4)A-G(7)(7)(7)-NN | M: Manual L: Automatic reset on left | NR: Opaque red NG: Opaque green NY: Opaque yellow NW:Opaque white NA: Opaque blue NB: Opaque black | 100 002 |
| A30NS-2M(3)- (4)(4)A-P(7)(7)(7)-NN | ||||||
| 2 | A30NS-2M(3)- (4)(4)A-G(7)(7)(7)-NN | 102 101 202 | ||||
| A30NS-2M(3)- (4)(4)A-P(7)(7)(7)-NN | ||||||
| 3 | A30NS-2M(3)- (4)(4)A-G(7)(7)(7)-NN | 111 222 122 112 | ||||
| A30NS-2M(3)- (4)(4)A-P(7)(7)(7)-NN |
Non-lighted, Three-position, Selector Switches
| Appearance | Bezel material | No. of outputs | Model | (3) Reset method | (4)(4) Operation Unit color | (7)(7)(7) Contact configuration |
|---|---|---|---|---|---|---|
| Brushed metal bezels  | 3M | 2 | A30NS-3M(3)- (4)(4)A-G(7)(7)(7)-NN | M: Manual L: Automatic reset on left R: Automatic reset on right B: Automatic reset on left and right | NR: Opaque red NG: Opaque green NY: Opaque yellow NW:Opaque white NA: Opaque blue NB: Opaque black | 110 011 101 220 022 202 120 102 210 201 012 021 |
| A30NS-3M(3)- (4)(4)A-P(7)(7)(7)-NN | ||||||
| 3 | A30NS-3M(3)- (4)(4)A-G(7)(7)(7)-NN | 111 222 122 212 221 211 121 112 | ||||
| A30NS-3M(3)- (4)(4)A-P(7)(7)(7)-NN |
Model Numbers for Sets
Shipped as a set that includes the Operation Unit, LED Lamp, Mounting Collar, Contact Block, and Lighting Unit.
Lighted, Two-position, Selector Switches
Bezel material : 2M
| Appearance | No. of outputs | Model | (3) Reset method | (4)(4) Operation Unit color | (7)(7)(7) Contact configu- ration | (8) LED Lamp color | (9) LED Lamp voltage |
|---|---|---|---|---|---|---|---|
| Brushed metal bezels  | 1 | A30NW-2M(3)- (4)(4)A-G(7)(7)(7)- (8)(9) | M: Manual L: Automatic reset on left | TR: Transparent red TG: Transparent green TY: Transparent yellow TW:Transparent white TA: Transparent blue TO: Transparent orange | 100 002 | R: Red G: Green Y: Yellow A: Blue O: Orange W:White | A: 6 VAC/DC B: 12 VAC/DC C: 24 VAC/DC D: 100/110/ 120 VAC E: 200/220/ 230/240 VAC |
| A30NW-2M(3)- (4)(4)A-P(7)(7)(7)- (8)(9) | |||||||
| 2 | A30NW-2M(3)- (4)(4)A-G(7)(7)(7)- (8)(9) | 102 101 202 | |||||
| A30NW-2M(3)- (4)(4)A-P(7)(7)(7)- (8)(9) |
Lighted, Three-position, Selector Switches
Bezel material : 3M
| Appearance | No. of outputs | Model | (3) Reset method | (4)(4) Operation Unit color | (7)(7)(7) Contact configu- ration | (8) LED Lamp color | (9) LED Lamp voltage |
|---|---|---|---|---|---|---|---|
| Brushed metal bezels  | 2 | A30NW-3M(3)- (4)(4)A-G(7)(7)(7)- (8)(9) | M: Manual L: Automatic reset on left R: Automatic reset on right B: Automatic reset on left and right | TR: Transparent red TG: Transparent green TY: Transparent yellow TW:Transparent white TA: Transparent blue TO: Transparent orange | 101 202 102 201 | R: Red G: Green Y: Yellow A: Blue O: Orange W:White | A: 6 VAC/DC B: 12 VAC/DC C: 24 VAC/DC D: 100/110/ 120 VAC E: 200/220/ 230/240 VAC |
| A30NW-3M(3)- (4)(4)A-P(7)(7)(7)- (8)(9) |
Note: Normally, the Operation Unit and LED Lamp with the same color are combined.
However, opaque white is available by combining a white Operation Unit and yellow LED. A30N[]-[][][]-TWA-[][][][]-Y[]
Switch Structure
Please order Operation Units, LED lamps (lighted models only), Mounting Collars, Contact Blocks, and Lighting Units (lighted models only) separately. LED lamps, Mounting Collars, Contact Blocks, Lighting Units, and Lock Ring can also be used with the A22N series.
Subassemblies
Please order Operation Units, LED lamps (lighted models only), Mounting Collars, Contact Blocks, and Lighting Units (lighted models only) separately. LED lamps, Mounting Collars, Contact Blocks, Lighting Units, and Lock Ring can also be used with the A22N series.
Operation Units
Non-lighted Switches
| Bezel material and shape | Brushed metal | ||
|---|---|---|---|
| No. of positions | Reset method | Operation Unit color | Model |
| 2 | Manual | Opaque red | A30NZ-2MM-NRA |
| Automatic reset on left | A30NZ-2ML-NRA | ||
| 3 | Manual | A30NZ-3MM-NRA | |
| Automatic reset on left | A30NZ-3ML-NRA | ||
| Automatic reset on right | A30NZ-3MR-NRA | ||
| Automatic reset on left and right | A30NZ-3MB-NRA | ||
| 2 | Manual | Opaque green | A30NZ-2MM-NGA |
| Automatic reset on left | A30NZ-2ML-NGA | ||
| 3 | Manual | A30NZ-3MM-NGA | |
| Automatic reset on left | A30NZ-3ML-NGA | ||
| Automatic reset on right | A30NZ-3MR-NGA | ||
| Automatic reset on left and right | A30NZ-3MB-NGA | ||
| 2 | Manual | Opaque yellow | A30NZ-2MM-NYA |
| Automatic reset on left | A30NZ-2ML-NYA | ||
| 3 | Manual | A30NZ-3MM-NYA | |
| Automatic reset on left | A30NZ-3ML-NYA | ||
| Automatic reset on right | A30NZ-3MR-NYA | ||
| Automatic reset on left and right | A30NZ-3MB-NYA | ||
| 2 | Manual | Opaque white | A30NZ-2MM-NWA |
| Automatic reset on left | A30NZ-2ML-NWA | ||
| 3 | Manual | A30NZ-3MM-NWA | |
| Automatic reset on left | A30NZ-3ML-NWA | ||
| Automatic reset on right | A30NZ-3MR-NWA | ||
| Automatic reset on left and right | A30NZ-3MB-NWA | ||
| 2 | Manual | Opaque blue | A30NZ-2MM-NAA |
| Automatic reset on left | A30NZ-2ML-NAA | ||
| 3 | Manual | A30NZ-3MM-NAA | |
| Automatic reset on left | A30NZ-3ML-NAA | ||
| Automatic reset on right | A30NZ-3MR-NAA | ||
| Automatic reset on left and right | A30NZ-3MB-NAA | ||
| 2 | Manual | Opaque black | A30NZ-2MM-NBA |
| Automatic reset on left | A30NZ-2ML-NBA | ||
| 3 | Manual | A30NZ-3MM-NBA | |
| Automatic reset on left | A30NZ-3ML-NBA | ||
| Automatic reset on right | A30NZ-3MR-NBA | ||
| Automatic reset on left and right | A30NZ-3MB-NBA | ||
Lighted Switches
| Bezel material and shape | Brushed metal | ||
|---|---|---|---|
| No. of positions | Reset method | Operation Unit color | Model |
| 2 | Manual | Transparent red | A30NZ-2MM-TRA |
| Automatic reset on left | A30NZ-2ML-TRA | ||
| 3 | Manual | A30NZ-3MM-TRA | |
| Automatic reset on left | A30NZ-3ML-TRA | ||
| Automatic reset on right | A30NZ-3MR-TRA | ||
| Automatic reset on left and right | A30NZ-3MB-TRA | ||
| 2 | Manual | Transparent green | A30NZ-2MM-TGA |
| Automatic reset on left | A30NZ-2ML-TGA | ||
| 3 | Manual | A30NZ-3MM-TGA | |
| Automatic reset on left | A30NZ-3ML-TGA | ||
| Automatic reset on right | A30NZ-3MR-TGA | ||
| Automatic reset on left and right | A30NZ-3MB-TGA | ||
| 2 | Manual | Transparent yellow | A30NZ-2MM-TYA |
| Automatic reset on left | A30NZ-2ML-TYA | ||
| 3 | Manual | A30NZ-3MM-TYA | |
| Automatic reset on left | A30NZ-3ML-TYA | ||
| Automatic reset on right | A30NZ-3MR-TYA | ||
| Automatic reset on left and right | A30NZ-3MB-TYA | ||
| 2 | Manual | Transparent white | A30NZ-2MM-TWA |
| Automatic reset on left | A30NZ-2ML-TWA | ||
| 3 | Manual | A30NZ-3MM-TWA | |
| Automatic reset on left | A30NZ-3ML-TWA | ||
| Automatic reset on right | A30NZ-3MR-TWA | ||
| Automatic reset on left and right | A30NZ-3MB-TWA | ||
| 2 | Manual | Transparent blue | A30NZ-2MM-TAA |
| Automatic reset on left | A30NZ-2ML-TAA | ||
| 3 | Manual | A30NZ-3MM-TAA | |
| Automatic reset on left | A30NZ-3ML-TAA | ||
| Automatic reset on right | A30NZ-3MR-TAA | ||
| Automatic reset on left and right | A30NZ-3MB-TAA | ||
| 2 | Manual | Transparent orange | A30NZ-2MM-TOA |
| Automatic reset on left | A30NZ-2ML-TOA | ||
| 3 | Manual | A30NZ-3MM-TOA | |
| Automatic reset on left | A30NZ-3ML-TOA | ||
| Automatic reset on right | A30NZ-3MR-TOA | ||
| Automatic reset on left and right | A30NZ-3MB-TOA | ||
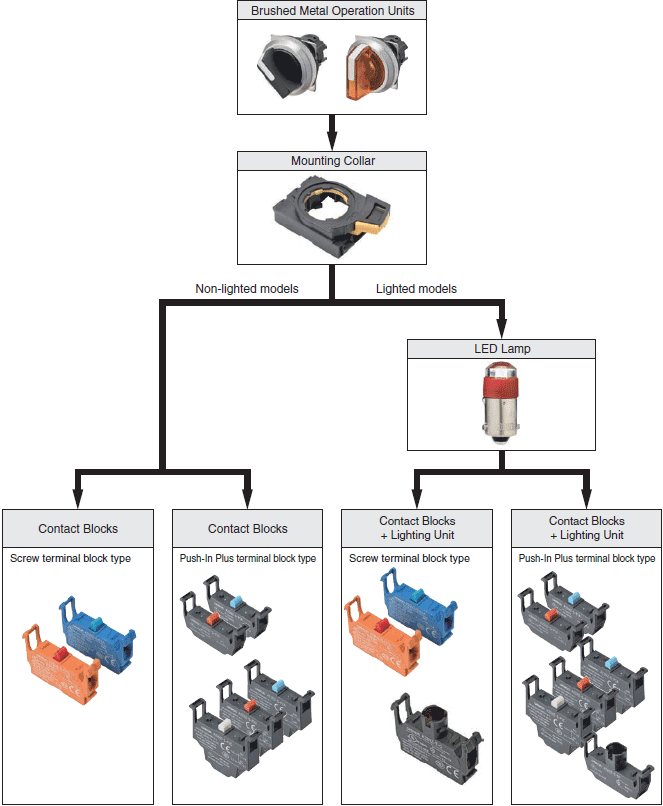
Subassemblies (Common)
Subassemblies
You can order Operation Units, LED Lamps, Mounting Collars, and Contact Blocks individually. Use them in combination for models that are not available as assembled Units. These can also be used as inventory for maintenance parts.
LED Lamps
| Appearance | Rated voltage | Model | ||||
|---|---|---|---|---|---|---|
| Color | 6 VAC/DC | 12 VAC/DC | 24 VAC/DC | 100/110/120 VAC | 200/220/230/ 240 VAC | |
 | Red | A22NZ-L-RA | A22NZ-L-RB | A22NZ-L-RC | A22NZ-L-RD | A22NZ-L-RE |
| Green | A22NZ-L-GA | A22NZ-L-GB | A22NZ-L-GC | A22NZ-L-GD | A22NZ-L-GE | |
| Yellow | A22NZ-L-YA | A22NZ-L-YB | A22NZ-L-YC | A22NZ-L-YD | A22NZ-L-YE | |
| White | A22NZ-L-WA | A22NZ-L-WB | A22NZ-L-WC | A22NZ-L-WD | A22NZ-L-WE | |
| Blue | A22NZ-L-AA | A22NZ-L-AB | A22NZ-L-AC | A22NZ-L-AD | A22NZ-L-AE | |
| Orange | A22NZ-L-OA | A22NZ-L-OB | A22NZ-L-OC | A22NZ-L-OD | A22NZ-L-OE | |
Mounting Collar
| Appearance | Model |
|---|---|
 | A22NZ-H-01 |
Contact Blocks
| Appearance | Terminals Specifications | Contacts | Model |
|---|---|---|---|
 | Screw terminal block | SPST-NO (blue) | A22NZ-S-G1A |
| SPST-NC (orange) | A22NZ-S-G1B | ||
 | Push-In Plus terminal block | SPST-NO (blue) | A22NZ-S-P1A |
| SPST-NC (red) | A22NZ-S-P1B | ||
 | Push-In Plus terminal block | DPST-NO (blue) | A22NZ-S-P2A |
| DPST-NC (red) | A22NZ-S-P2B | ||
| SPST-NO/SPST-NC (white) | A22NZ-S-P2C |
Lighting Units
| Appearance | Terminals Specifications | Rated voltage | Model |
|---|---|---|---|
 | Screw terminal block | 6 VAC/DC | A22NZ-T-A |
| 12 VAC/DC | A22NZ-T-B | ||
| 24 VAC/DC | A22NZ-T-C | ||
| 100/110/120 VAC | A22NZ-T-D | ||
| 200/220/230/240 VAC | A22NZ-T-E | ||
 | Push-In Plus terminal block | 6 VAC/DC | A22NZ-T-AP |
| 12 VAC/DC | A22NZ-T-BP | ||
| 24 VAC/DC | A22NZ-T-CP | ||
| 100/110/120 VAC | A22NZ-T-DP | ||
| 200/220/230/240 VAC | A22NZ-T-EP |
last update: April 16, 2018
- NO. A30NS / A30NW
- TYPE:Push Buttons / Indicator Lamps φ30 Type
 Copyright Statement
 - DATE:2021-06-12
- Associated products:
A30NN / A30NL Pushbutton Switches/Features A30NK Key-type Selector Switches/Features